LabView Utility Routines: Pulse Height |
 |
Usage
When one operates a PMT in photon counting mode the question is always where to put the discriminator level. From the signal to noise ratio point of view it seems that the optimum will be a level where most of the noise counts are removed while only a minor part of the signal is lost. This point is called the valey point. There are two modes that a pulse height distribution can be shown:
- Integral Mode
- Here all counts that are received when the discriminator is set to specific level are shown
- Differential Mode
- Here are only the counts shown that differ from the neighbouring discr. level
In order to acquire a pulse height distribution one needs to set the PMT to a desired voltage and supply some continous background level, we found that a signal with a mean of 2MHz or 0.1 count per bin is just fine. A sky with scattered clouds is definetely not continous enough. A LED with a DC supply should be fine.
So before one runs the PHD software the corresponding light levels should be set up. As referenz level we use discriminator level of 10, which corresponds to 3mV. The first image shows a typical dark PMT with a background count rate of 0.002 counts per bin, this corresponds to a 40kHz count rate.

When the continous light is applied the signal rises to 0.1 count per bin or 2MHz.

We found that this are good conditions to get a PHD.
The necessary software for this is by the HS-Pulse heigth-disribution.vi from the HS-Pulse.llb or the Pulse Height Distribution.exe if you use an executable.
 | The first step is to press the LabView typical Run button. |
You should then select the transient recorder at the digitizer# control.
While a shotnumber of 100 is fine for a integral pulse height distribution, one should select significantly more for a differential pulse height, for instance 4000. In order to get the PHD one would then acquire 4000 * 63 shots. The trigger should then come from a faster trigger source as typical lasers are. 4000*63 at 30Hz require 8400 sec ( or 2.3h) while a typical TR 20-160 can run at 300Hz which will cut the acquisition time down to 840 sec or 14min. One needs to keep the ilumination level constant over this period of time as it would otherwise distort the the PHD.
A typical sample of a integral PHD with 100 shots is shown below. One needs to press the Start button to begin with the data acquistion. The data will be shown once the shots for a discriminator level are acquired.
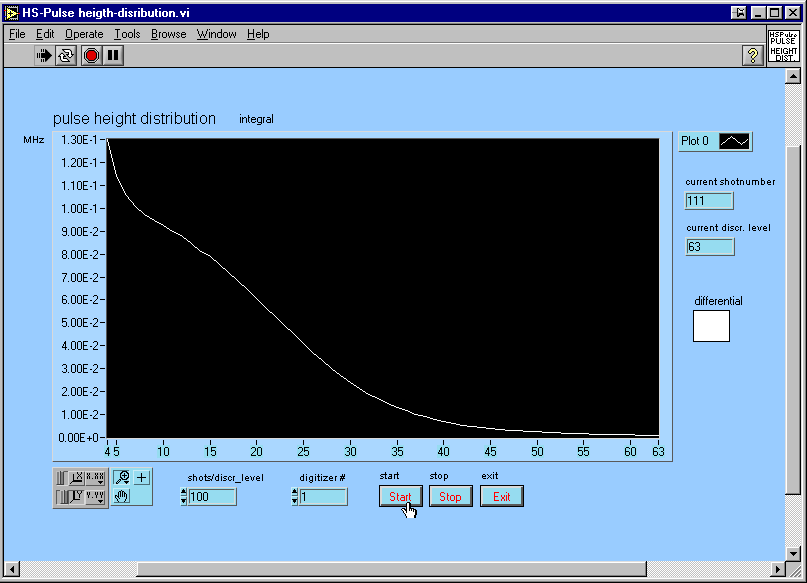
Please notice the change in the slope around discriminator level 10. The differential PHD for the same light intensity makes that more obvious. One needs to select the differential field on the right side of the data display to get the differential PHD.
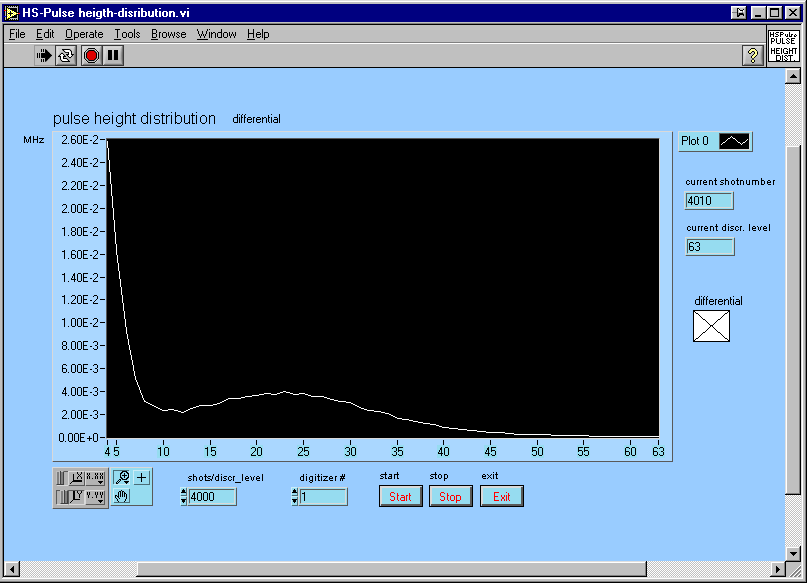
Here the valley point is at 10 which should be used in the acquisition programm. As the valley is not very sharp a discriminator level of 8 might also be a good choice.
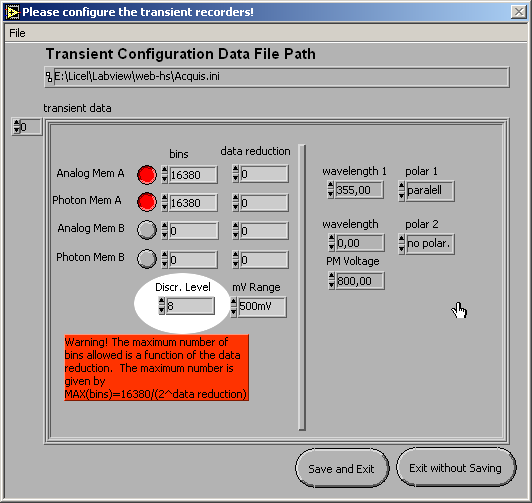
These values can then be used in the configuration data of the transient recorder in the acquisition programm.
Back to index